 English
 Español
  Português
  русский
  Français
  日本語
日本語  Deutsch
  tiếng Việt
  Italiano
  Nederlands
  ภาษาไทย
  Polski
  한국어
한국어  Svenska
  magyar
  Malay
Malay  বাংলা ভাষার
  Dansk
Dansk  Suomi
Suomi  हिन्दी
  Pilipino
  Türkçe
  Gaeilge
  العربية
  Indonesia
  Norsk
Norsk  تمل
تمل  český
český  ελληνικά
  український
  Javanese
  فارسی
فارسی  தமிழ்
தமிழ்  తెలుగు
  नेपाली
  Burmese
  български
  ລາວ
ລາວ  Latine
  Қазақша
  Euskal
  Azərbaycan
  Slovenský jazyk
  Македонски
  Lietuvos
  Eesti Keel
  Română
  Slovenski
  मराठी
मराठी  Srpski језик


Timing Chain and Tensioner Replacement Guide
2024-08-23
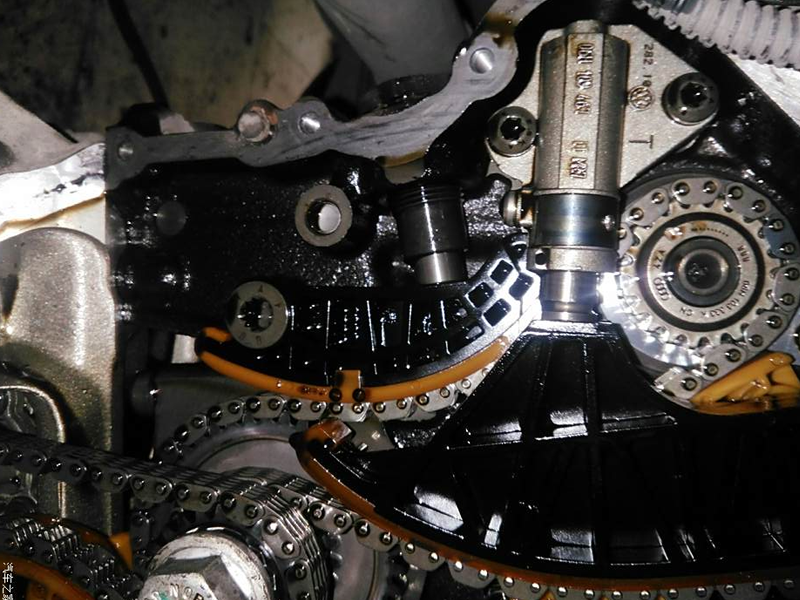
Replacing the timing chain and tensioner is an important maintenance task, especially for vehicles with high mileage. The timing chain connects the crankshaft to the camshaft, ensuring accurate valve timing. Over time, the chain can wear and stretch, leading to timing issues that affect engine performance. Additionally, the tensioner ensures the chain maintains proper tension, preventing slack or skipping. This article will detail the process of replacing the timing chain and tensioner.
### Timing Chain and Tensioner Replacement Guide
#### Tools and Materials Needed
- Tool kit (including wrenches, screwdrivers, sockets, etc.)
- New timing chain
- New tensioner
- Engine oil (as needed)
- Oil funnel
- Gloves
- Safety glasses
#### Safety Precautions
1. **Ensure the Engine is Cool**: Before beginning any work, make sure the engine has completely cooled down.
2. **Disconnect the Battery**: Disconnect the negative battery cable to prevent accidental starting.
3. **Use Proper Jack Stands**: Use appropriate jack stands to support the vehicle to prevent it from slipping.
#### Replacement Steps
1. **Preparation**: Open the hood and locate the timing chain area. The timing chain is typically located at the front of the engine, protected by a timing cover.
2. **Remove the Timing Cover**: Use the appropriate tools to remove the bolts securing the timing cover. Be careful not to lose any small parts.
3. **Inspect the Chain Condition**: Observe the timing chain for any signs of obvious wear or damage. Also, check the condition of the tensioner to see if it is worn or defective.
4. **Loosen the Tensioner**: Depending on the model, some tensioners can be loosened by turning them, while others require a special tool. Refer to the vehicle's service manual for instructions.
5. **Remove Old Chain and Tensioner**: Carefully remove the old timing chain and tensioner. Avoid letting the chain hang freely to prevent confusion.
6. **Install New Tensioner**: Install the new tensioner and ensure it is properly seated. Adjust the tensioner as needed according to the requirements.
7. **Install New Chain**: Install the new timing chain following the correct sequence. Note the direction of the chain and ensure the markings face the correct side.
8. **Adjust Chain Tension**: Use a specialized tool to adjust the tensioner and ensure the chain is under proper tension.
9. **Reinstall the Timing Cover**: Once you confirm the chain and tensioner are correctly installed, reinstall the timing cover and tighten the bolts.
10. **Check for Leaks**: Reconnect the battery, start the engine, and check for any leaks. Ensure everything is functioning normally before closing the hood.
#### Notes
- During the replacement process, carefully read the vehicle’s service manual for specific steps and precautions.
- For those unfamiliar with this task, professional assistance is recommended.
- After replacement, ensure an appropriate break-in period for the new components so they can better adapt to the engine environment.
### Conclusion
Replacing the timing chain and tensioner is a technically demanding maintenance task that requires specific knowledge and experience. By following these steps, you can effectively complete the task and ensure the stability and reliability of the engine. If you are uncertain about performing this work, consider contacting a professional service center.


X
We use cookies to offer you a better browsing experience, analyze site traffic and personalize content. By using this site, you agree to our use of cookies.
Privacy Policy